Table of Contents
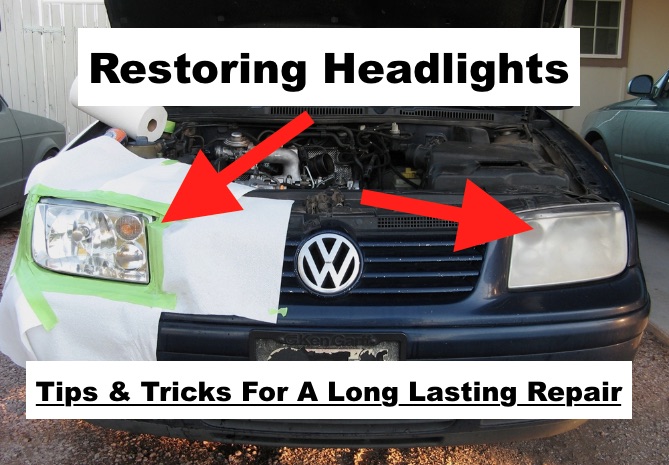
 Here is a proven method to restore your headlights to like new in 2018:
The process is simple and proven. You will first start by cleaning your headlights thoroughly to remove all the surface dirt and grime. Use any soap, degreaser, or car wash and really scrub the lights (protect your cars paint from abuse if using strong chemicals).
Next, you will start with a rough grit wet sandpaper (around 400-600 grit) and start sanding it using horizontal strokes. Since you will be wet sanding you will need to be constantly applying a lubricating liquid (dish soap mixed with water works great) to the sand paper and headlight.
A spray bottle works great for this, or dipping the sand paper in a bucket with the soap mixture also works great.
Gradually go to finer and finer grit sandpaper, and end at around the 2000-3000 grit sandpaper. You should spend around 10 minutes on the sanding part and work up a sweat.

After finishing the clear coat let it dry overnight (cure). Then take your polish (Plastx) and apply some to a new paper towel and start really putting in some elbow grease polishing the headlight in circular motions. The idea is to apply a lot of pressure and actually get the polish to head up a little bit. You should sweat a little. Turn the paper towel over and polish the headlight again with the clean part of the paper towel removing any haze.
Next grab your wax, and go through the same process as the polish. Just like you would wax a car, wax the headlight. Step back and enjoy your new very clear headlights. If you want to see the process I agree with the most, just watch ChrisFix’s video here and see him go through the steps one by one.
First, you will need to make sure your headlights can be restored. They must be a plastic based headlight, not the glass kind. Almost all new cars are plastic based headlights anyways, and you can tell by just tapping them with your finger and seeing if it feels like glass or plastic.

Here is what you should have (all links that follow link to Amazon):
- A sampler pack of wet sanding paper from 400 grit to 3000 grit. This package is a great deal. Check price on Amazon here.
- Rubbing Alcohol (any store brand will do) this stuff happens to be %99 Alcohol which works great.
- Some kind of protective wax to apply after. This wax comes recommended by others for headlights / detailing of cars.
- Clear coat to spray the finished sanded headlight.
- A polish to help remove orange peel from the clear coat.
- A bucket or spray bottle for the lubricating of the headlight.
What about toothpaste, bug spray, and all the other hacks out there?
I attached some videos that on YouTube have millions of views. Chrisfix’s videos at least are disclaimers that these may make the headlights look better for a couple of weeks but in reality, they cause more damage than good.
The one that I have done myself and is fun to do on friends cars to just show them what their headlights could look like if they did the actual real method (sanding and clear coating). However, the main problem is that IT DOES NOT LAST.
So, if you want to just have some fun and make a headlight look a ton better fast. Grab some toothpaste, a paper towel, and start polishing away. It will usually clear up a plastic headlight pretty well.
Just stay away from the bug spray, or the wipes online that claim to restore your headlight in 30 seconds. I guarantee you these are marketing scams, and people are making tons of money on them.
Watch the rest of the videos below to see what the deal is:
Want to know a cool trick that can tell you a lot about a car?
Have you ever seen a car that has had one headlight that was super cloudy and the other was clear?
Ever thought that that was weird and there must be an explanation for why that is? 9 out of 10 times that is because the car was involved in front end collision. One of the headlights was replaced and the other was left as the original.
It is a great trick to know if you’re looking at buying used cars in 2018, or just want to impress your friends. You can ask someone that has a car like that, oh did this get in a front end collision?
They’ll likely ask, yes? how did you know?
Well, you see how cloudy your one headlight is versus the other? Yeah, that pretty much gave it away.
Restoring headlights also increases the value of your car before you sell:
There are many ways you can increase the perceived value of your car before you sell it. Cleaning the headlights is one of the most valuable I believe.
Ever seen all those old VW beetles and Jettas? They all have extremely cloudy headlights that severely affect your ability to even see at night.
It is one of the first things I notice when I see one of these cars on the street or for sale. With 30 minutes of work and some simple supplies like I listed above, they could easily make the appearance of their cars look 10x better.
Combine that with using a product that restores the plastic trim on the outside of your car to a black look. The car will look 10000 times better (ok I may be exaggerating a little bit,) but really just try it out.
Here is a product (it is called Mother’s back to black) I loved to use on cars with the sun faded black trim or wheel wells. It works great and actually lasts a long time.
I am a little embarrassed to say this, but as a cheaper hack I used to use shoe polish (black) to restore black plastic trim pieces. It worked great for me.
Well there you go, that is how you actually restore your headlights in 2018.
Don’t fall victim to the hundreds of marketing gimmicks out there trying to get you to buy a headlight restore “kit,” you can do much better yourself.
Because the kits don’t include enough sand paper usually and don’t last long at all. You may as well buy more sandpaper than you need, and have it around for tons of other projects.
There you go, my headlight restoration guide for 2018. Thanks!
Read — Best Ratchet Set of 2018 and buying guide for price and value.


 Here is a proven method to restore your headlights to like new in 2018:


